Tuesday, July 1, 2014

How to Create Your Own Illustrated Characters in PowerPoint

How to Create Your Own Illustrated Characters in PowerPoint

Link to The Rapid eLearning Blog

How to Create Your Own Illustrated Characters in PowerPoint

Posted: 01 Jul 2014 12:31 AM PDT

Articulate Rapid E-Learning Blog - how to create illustrated characters in PowerPoint

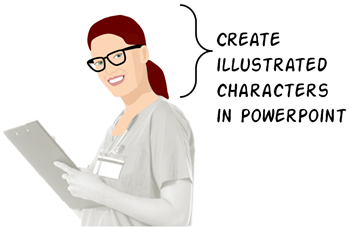
PowerPoint is a versatile application. You can use it for all sorts of things from presentations to online training programs. In previous posts I've shown you how to customize clip art and create your own graphics.

Today's tip comes courtesy of blog reader, Daniel Albarrán. He sent me an email stating that once he understood the versatility of PowerPoint it opened his eyes to all sorts of possibilities—one of them being the ability to create illustrated characters.

How to Create Illustrated Characters in PowerPoint

Here are some of the graphics he created in PowerPoint.

Articulate Rapid E-Learning Blog - examples of illustrated characters created in PowerPoint

Articulate Rapid E-Learning Blog - more examples of illustrated characters created in PowerPoint

As you can see, PowerPoint's a capable application. I asked Daniel to create a screencast showing how he creates the graphics. Here's his tutorial.

Click here to view the PowerPoint tutorial.

Pretty cool, huh?

Tips When Creating Illustrated Characters in PowerPoint

Want to create your own illustrated characters? I created a couple of more tutorials with a few extra tips to add to what Daniel started. You can view the tutorials below.

Part 1: Working with PowerPoint's curve shape.

Click here to watch the PowerPoint tutorial.

Part 2: Working with the custom shapes.

Click here to watch the PowerPoint tutorial.

Here's a roundup of the PowerPoint tips:

  • Practice using the Curve tool so that you can control the curve and not create too many points. The fewer the points, the easier it is to edit.
  • Edit the shape. Right click on the shape to access the Edit Points feature. From there you can move the points and make adjustments and small tweaks.
  • Show & hide shapes using the Selection Pane.
  • Name the shapes in the Selection Pane for easier management of the image.
  • Use the Shape Union feature to merge the shapes. You can also group them if you want editing control in the future.
  • Right click to save the image. Select .png format to retain the transparency.
  • Don't worry about being perfect. Also, the less detail the easier it is.
  • Practice, practice, practice. Once you get the hang of it, you'll never want for the right image. Play around with the gradients and layered objects to create more texture and richness.

Articulate Rapid E-Learning Blog - an illustrated character created in PowerPoint

Here's the character I created for the tutorials and the one Daniel shared with me. Feel free to look at how they were created.

Now it's up to you. Do a practice character and share it with us in the comments section.


          Community Blog Posts & Tutorials

              Upcoming Events & Workshops

              • September 10 & 11: Denver, CO. E-Learning Heroes Roadshow. Hands-on activities that explore general course design as well as a boatload of Articulate tips and tricks. Sign up here before it sells out.

              • September 22 & 23: Minneapolis, MN. E-Learning Heroes Roadshow. Hands-on activities that explore general course design as well as a boatload of Articulate tips and tricks. Sign up here before it sells out.

              • October 21 & 22: Boston, MA. E-Learning Heroes Roadshow. Hands-on activities that explore general course design as well as a boatload of Articulate tips and tricks. Sign up here before it sells out.

              • October 7 & 8: Dallas (ASTD). Two rapid elearning workshops. Sign up here.

                Day 1: PowerPoint for E-Learning

                Day 2: Building Interactive E-Learning with Articulate Storyline.

              • October: Las Vegas (Devlearn).


                  Post written by Tom Kuhlmann


                  Download your free 46-page ebook: The Insider's Guide to Becoming a Rapid E-Learning Pro

                  The post How to Create Your Own Illustrated Characters in PowerPoint appeared first on The Rapid eLearning Blog.

                  No comments:

                  Blog Archive