Here’s How to Create Your Own E-Learning Template in PowerPoint |  |
| Here’s How to Create Your Own E-Learning Template in PowerPoint Posted: 20 Aug 2013 12:23 AM PDT
Recently I shared some free PowerPoint templates to use for online learning and got a few questions about how I created one of them. So today I'll share how I created the free template and some of the general considerations when designing your own templates and visual course design. PowerPoint Enables Building E-Learning TemplatesAs many of you know I do a lot of my graphics work in PowerPoint because it's a very capable tool. The free elearning template that I shared in a recent post is a good example of what you can in PowerPoint when it comes to building your own templates or doing any custom graphics work.
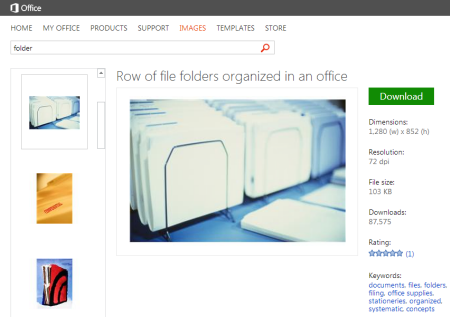
In this post I'll walk through a few key productions techniques. Even if you don't care about this template or building your own templates, the techniques can be applied to all sorts of custom graphics production using PowerPoint. You Have Access to Free Stock ImagesInitially I wanted to create an office themed template. So I downloaded the folder image below. The image was provided by Microsoft. Many of the pay stock image sites like istockphotos and Fotolio make images available through this site. They're the smaller, low res versions. But that's usually all you need. This is important to remember (especially if you have limited resources).
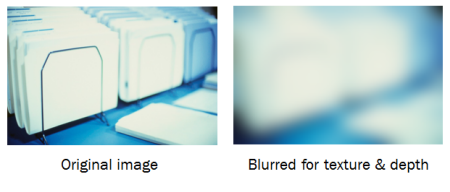
Edit Your E-Learning Graphics in PowerPointThe folder image is my background. So I intended to add a slight blur to it. The blur allows the image to set some context but not draw the focus from the content box that would be on top.
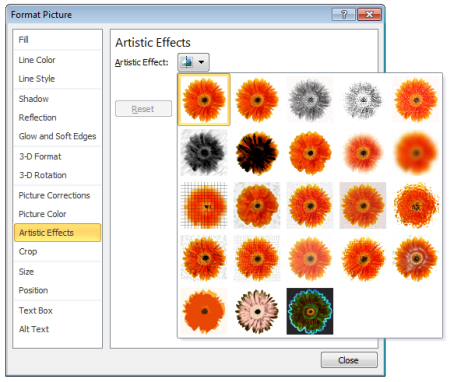
Once I started messing around with the image I realized I wanted the texture of the blurred image, but not really make the folder evident. So I decided to add a more prominent blur. This gives the background some depth and texture without adding too much noise. Starting with PowerPoint 2010, there are all sorts of artistic effects that can be applied to your images and blurring is one of them.
Create Custom Stock ImagesOften we focus too heavily on written content and lose sight of the personality of the course. So I wanted to add a person to the screen to add some personality and to lighten the screen visually.
One of my favorite features in PowerPoint 2010 is that I can remove backgrounds. What I like to do is find images with people in them and then remove them so that I have an isolated person. The image above could easily become four isolated people images. In the example from the free template it was really easy because the image I selected had a solid white background.
Match the Color of Your Course Template to Your Stock ImageI needed a box to hold my objectives content so I added a box to the image. This served as my content placeholder. That's easy enough to do. Just add a shape.
To get the right colors I did a color pick from the background image. To do that I used Pixie which is a free application that makes color picking real easy. I believe PowerPoint 2013 has a color picker and if you use Articulate Storyline you'll also find a color picker in the color format properties. If not, use a tool like Pixie.
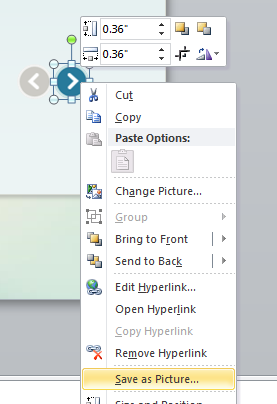
Create Your Own GraphicsI created the arrow circles by combining shapes and then right-clicked to save the arrow as an image. Then I brought it back in as an image rather than shapes.
The reason I like to save as image is that I can then apply the image formatting to the graphics. In the case of the arrow, I recolored it as an end cap at the beginning and end of the interaction.
Control Eye Movement with ShadowsOne thing I learned in a design class years ago was how to control eye movement using light and dark areas. In this example I can draw the focus away from the edge to the center of the screen.
To do this, I added a darker space that serves as a visual dead end. This was easy to do. I created a rectangle shape and used a gradient fill. One part of the fill used a darker color pick from the image. And the other part was transparent so it blended with the background.
Additional bonus tips:
Hopefully the free templates provide value and help with your elearning projects. But my greater hope is that by learning these tips and tricks you'll be able to create your own graphics and templates to enhance your online training programs. Tidbits: Community Resources
Upcoming Workshops
Download your free 46-page ebook: The Insider's Guide to Becoming a Rapid E-Learning Pro |
| You are subscribed to email updates from The Rapid eLearning Blog To stop receiving these emails, you may unsubscribe now. | Email delivery powered by Google |
| Google Inc., 20 West Kinzie, Chicago IL USA 60610 | |
--
Posted By tremeex to tremeex at 8/20/2013 07:13:00 AM
--
Posted By tremeex to tremeex at 8/20/2013 07:13:00 AM
--
Posted By tremeex to tremeex at 8/20/2013 07:13:00 AM
--
Posted By tremeex to tremeex at 8/20/2013 07:13:00 AM
--
Posted By tremeex to tremeex at 8/20/2013 07:13:00 AM
--
Posted By tremeex to tremeex at 8/20/2013 07:13:00 AM
--
Posted By tremeex to tremeex at 8/20/2013 07:13:00 AM
--
Posted By tremeex to tremeex at 8/20/2013 07:13:00 AM
--
Posted By tremeex to tremeex at 8/20/2013 07:13:00 AM
--
Posted By tremeex to tremeex at 8/20/2013 07:13:00 AM
--
Posted By tremeex to tremeex at 8/20/2013 07:13:00 AM
--
Posted By tremeex to tremeex at 8/20/2013 07:13:00 AM
--
Posted By tremeex to tremeex at 8/20/2013 07:13:00 AM
--
Posted By tremeex to tremeex at 8/20/2013 07:14:00 AM
--
Posted By tremeex to tremeex at 8/20/2013 07:14:00 AM
--
Posted By tremeex to tremeex at 8/20/2013 07:14:00 AM
--
Posted By tremeex to tremeex at 8/20/2013 07:14:00 AM
--
Posted By tremeex to tremeex at 8/20/2013 07:14:00 AM
--
Posted By tremeex to tremeex at 8/20/2013 07:14:00 AM
--
Posted By tremeex to tremeex at 8/20/2013 07:14:00 AM
--
Posted By tremeex to tremeex at 8/20/2013 07:14:00 AM
--
Posted By tremeex to tremeex at 8/20/2013 07:14:00 AM
--
Posted By tremeex to tremeex at 8/20/2013 07:14:00 AM
--
Posted By tremeex to tremeex at 8/20/2013 07:14:00 AM
--
Posted By tremeex to tremeex at 8/20/2013 07:14:00 AM
--
Posted By tremeex to tremeex at 8/20/2013 07:14:00 AM
--
Posted By tremeex to tremeex at 8/20/2013 07:14:00 AM
--
Posted By tremeex to tremeex at 8/20/2013 07:14:00 AM
--
Posted By tremeex to tremeex at 8/20/2013 07:14:00 AM
--
Posted By tremeex to tremeex at 8/20/2013 07:14:00 AM


No comments:
Post a Comment